Monday, August 25, 2008
Party Food..?
Sunday, August 24, 2008
Birthday/Cocktail Party!
Last night was Megan's party & everything turned out great! My sister & I prepped everything in the morning so we could spend time with our friends at the party, We also had a lot of people bring an hors d'oeuvre which was a huge help to us! We set up the bar outside & kept the food inside...this way you create two areas to mingle. Cocktails are great outside when the weathers nice, I like to have plenty of seating out there because its usually where everyone ends up at the end of the night! Here are some pictures of our night... including my sister Nicole's FABULOUS pink cupcakes & Todd's WONDERFUL cucumber sandwiches!
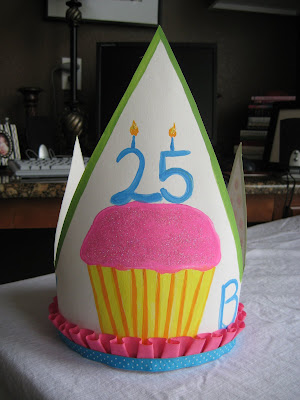
Nicole's cupcakes & Megan's Birthday hat!! ( A tradition-)
Getting the bar ready before everyone arrives........ My mom starts the martinis!!! We set up a picture border for everyone to sign, I think these are great for a big occasion- its a nice keep-sake for whoever the celebration is for.
My mother made the Fabulous sign for our door & the traditional birthday hat! We had a great group of people & am thankful to everyone who helped make this such a great party!
HAPPY BIRTHDAY MEGAN!!!!
Friday, August 22, 2008
Cocktail Party/ Megan's Birthday Cake!!
This is very important when making a cake covered in fondant, which I will be doing(this is because you want the cake to stay moist). I'm going to make another painted cake similar to my first post...The colors we are using at the party are pink & green so I will be using those colors on the cake! I have been taking pictures as I go so you can see from the very beginning to end how its done. I am also making a cheese and fruit platter which will not require prepping today & baked brie- which also will not need prepping. I will try to post more tomorrow but with the party & last minute cooking it might be Sunday when I find time to post the pictures & talk about everything....
Red Velvet Painted Cake..... in the making
The batter needs to be silky smooth...as little clumps as possible so it will bake nice! As you can see the batter will be very red!! This is great for making shark cakes or armadillo cakes- so when you cut into it, its like blood! I'm just doing red because it also looks pretty! More to come...
Once you have baked your cake & let it cool overnight, its time to cut & ice. I cut my cake into 3 layers ( you can do any size cake you like) once cut each layer gets a light coating of simple syrup & a small amount of buttercream. You dont want to add to much buttercream because the fondant is so sweet it would be overwelming. Once all my layers are put together, I put a very thin coating of buttercream on the outside...just enough to help the fondant stick to the cake, once you have this completed you can roll your fondant out. This should not be done any sooner because it will dry out very quickly! I have taken pictures of each step I just explained so you can see...
Now..once the cake is covered you can get everything together to paint, I use gel food coloring & vodka. The alcohol helps dry the paint so it wont run all over the fondant. I use a very fine tip paint brush because its easier to paint with. You only need a small amount of gel & add about a tablespoon or more of vodka until the mixture is pretty watered down. Then you can paint!
These cakes are so much fun to make & a great personal touch to any celebration!
Monday, August 18, 2008
Update!
Wednesday, August 13, 2008
California Turkey Burger
1# Ground Turkey Meat
Kosher Salt & Ground Black Pepper
Kieser Rolls
Toppings-
Sliced Avocado
Bib Lettuce
Sliced Beefsteak Tomatoes
Sliced Pineapple
lime ( I like to sqeeze the juice on the avocado once its cut, it prevents the avocado from turning brown & adds more flavor!)
I like to top mine off with ranch dressing...just my preference! Season the meat with salt & pepper- if your not sure if you have seasoned enough, take a small piece to cook off and taste. Slice up all your toppings and arrange how you like!
Sunday, August 10, 2008
Blueberries & Tea...
Blueberry Scones:
2 cups all-purpose flour
1 tablespoon baking powder
1/2 teaspoon salt
2 tablespoons sugar
5 tablespoons unsalted butter, cold, cut in chunks
1 cup heavy cream, plus more for brushing the scones
1 cup fresh blueberries
Lemon Glaze:
1/2 cup freshly squeezed lemon juice
2 cups confectioners' sugar, sifted
1 lemon, zest finely grated
1 tablespoon unsalted butter
Preheat the oven to 400 degrees F
Sift together the dry ingredients; the flour, baking powder, salt, and sugar. Using 2 forks or a pastry blender, cut in the butter to coat the pieces with the flour. The mixture should look like coarse crumbs.
Make a well in the center and pour in the heavy cream.
Fold everything together just to incorporate; do not overwork the dough.
Fold the blueberries into the batter. Take care not to mash or bruise the blueberries because their strong color will bleed into the dough.
Press the dough out on a lightly floured surface into a rectangle about 12 by 3 by 1 1/4 inches. Cut the rectangle in 1/2 then cut the pieces in 1/2 again, giving you 4 (3-inch) squares.
Cut the squares in 1/2 on a diagonal to give you the classic triangle shape.
Place the scones on an ungreased cookie sheet and brush the tops with a little heavy cream. Bake for 15 to 20 minutes until beautiful and brown. Let the scones cool a bit before you apply the glaze.
Technically you should make this simple lemon glaze in a double boiler (i.e. over a pot of simmering water with a heatproof bowl set on top) but it's even simpler to zap it in the microwave.
Mix the lemon juice and confectioners' sugar together in a microwave-safe bowl. Stir until the sugar dissolves.
Add the lemon zest and butter. Nuke it for 30 seconds on high.
Whisk the glaze to smooth out any lumps, then drizzle the glaze over the top of the scones. Let it set a minute before serving.
The Key to making these scones so good is really being careful about over-working the dough, I barley mix the dough...you just want the wet ingredients and dry to come together,its not going to be smooth. Otherwise you will have chewy, hard over-worked scones..:( nobody wants to eat that...
I have included pictures along the way...I always enjoy seeing what the product is suppose to look like before I dive into a project. I hope you enjoy!
Saturday, August 9, 2008
One Of My Favorite Things...
Revive - Peach Green Tea
Glow - Berry Jasmine
Relax - Vanilla Chai
Calm - Plum Honey Lavender
Refresh - Pink Grapefruit Lychee
Pomegranate Blueberry
Mango Pineapple Passion Fruit
Kiwi Passion Fruit Lime
Cherry Black Currant
Marion berry Guava
Painted Cakes...?
I recently came across a website that featured painted cakes...I was intrigued by the idea. I love being creative with my food, I am also a painter so of course I had to make one! This is the very first, I basically used Fondant to cover the cake and painted with a mixture of Vodka and Gel food coloring...the vodka helps it dry quickly so it doesn't run all over your cake. The top is rice crispy treat molded and covered as well with Fondant.
These cakes make a great gift for someones birthday or any celebration...I gave this cake to a friend with the cake stand for her birthday. On top of being a food lover/painter, I also LOVE to shop..especially for kitchen items and serving dishes! So I have become the ultimate bargain shopper and have found some great pieces for very low prices...so now when I see great pieces like this cake stand, I store them for situations like this!